MG-Cars.info
MG MG Y Type YT Sills BBS discussion at MG-Cars.info

MG-Cars.info
Welcome to our Site for MG, Triumph and Austin-Healey Car Information.
Recommendations
Parts
MG parts spares and accessories are available for MG T Series (TA, MG TB, MG TC, MG TD, MG TF), Magnette, MGA, Twin cam, MGB, MGBGT, MGC, MGC GT, MG Midget, Sprite and other MG models from British car spares company LBCarCo.
MG MG Y Type - YT Sills
| Hello all. I have got the door wood sorted on my YT build, and will soon be moving to the worst of the car, the sills. I will be ordering the sill repair panels from NGT, but these are only the sides and bottom of the sill channel. The top layer of my sills is also very rusty and needs replacing. Does anyone have photo's and/or a description of doing this. I expect to have the body off the frame when I do this. The top of the sills appear to be a number of layers of metal, can anyone comment on this?
As always, thanks in advance for any advise and direction you all may have. Joe |
| J.D. Hine |
| Hi Joe There are photos of the cut out sills on my YT and the locally made replace sills on a thread I created back in 2017. Search the archives for "Sill Rust" and scroll down to the thread with title "Sill Rust". There are others (especially FT Franz of Germany) who have done a lot of rust replacement, I hope they chime in with helpful hints. FT Franz has a very comprehensive page on another site detailing his restoration, including rust repairs. cheers Stuart |
| Stuart Duncan |
| Hi here you should look what to do if question ask me directly https://www.mgexp.com/forum/t-series-and-prewar-forum.46/mg-ya-no-1675-from-1948.4022768/ |
| FT Franz |
| Thanks Stewart and FT....I've managed to look at all your photo's My sills are in much worse shape than yours stewart. I"ll post some photo's in a day or two. The part of the sills that the body mounting bolts go through is very rusty on mine so I think I have work to do there first. Cheers. Joe |
| J.D. Hine |
| post some pictures or sent it directly, perhaps i can help |
| FT Franz |
| Rusted sills can certainly be a problem in YT s or any Y fir that matter. Body strength can certainly be compromised , but at least we have a chassis to support all.
My problem was /is probably more severe than yours when the body was cut in two near the hinge pillar. At least I was able to see the actual profile and how it was put together and I think understand what you are saying about yours. I also ordered all sections from NTG left and RHS. Got busy with cutting out rust and where was some metal with support used kill rust then fishoilene and joining together to given even more improved strength. Have had to adopt welding skills and once you pull apart , stand back look and think , a sense of order of action begins to prevail. Also the rear end and rear wheel arches have been attended to. We are winning the battle now , but it has taken much time. The question comes when we join up how will the doors close perfectly.? You may also need to cut out and manufacture some of your own sill pieces from sheet metal, Ryobi metal shears air driven are a blessing. I would love to be at your side , but dont hold back ,jump in, metal always be repaired , mistakes with wood not so forgiving. Following photos may give some idea of predicament . 
 |
| CR Dickinson |
| I have a YA so i don't know exactly what it looks like does the YT have wood like a tc or is it all steel if it is all steel i would stabilize it before taking it off the chassis like i did on my YA doesn't cost much and saves a lot of hassle and is done in 2 or 3 houres if the sills are rusted and no longer hold properly then the body can warp and if you then redo everything and everything is stable it will be difficult to straighten the crooked on the chassis again |
| FT Franz |
| Hi FT Franz
To answer - there is no wood in YT , all steel exc doors and dash There was no need to stabilise before taken off chassis as it was already cut in two. As I said the trick now is to hang the doors and check for twist and flex. But it does sit on a chassis, unlike the Porsche Targa on a hoist , you can see it flex and the door gaps open. The Y is built like a tough truck Will post a pick when close to joining. I show you pick on stabilising and that will be necessary when moving the body from the spare chassis onto its own , we have triangulated bars ready to be bolted in 3D 
 |
| CR Dickinson |
| CR...thanks for your post, you are in a bit worse situation than me. I am a bit restricted for room at the moment with the garage full of winter stored cars. I don't have much room to work on the YT. I'm waiting for the parts from england to see how much fabrication I'll have to do to fix the sills. I'm sure it can be done, just figuring it out and planning the way to do it. I'll have the body off in the spring so I'll have a better idea. I'm going to work on the doors and fenders over the winter. Welding needed there as well. I have welded in braces to maintain the shape of the body.
Its a bit of a journey for sure. I hope this project doesn't outlast me LOL. I'll get some photo's posted soon. Joe |
| J.D. Hine |
| Hi again everyone Here are some photo's of the left side sill on my YT. The one on the other side is similar. I"ll drop a couple more as well. Joe 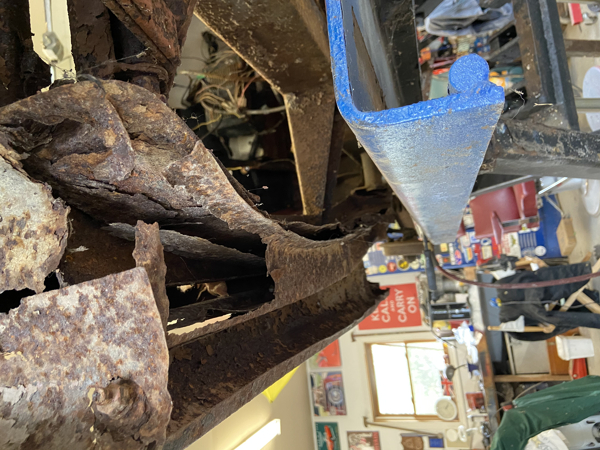
 |
| J.D. Hine |
| Here is another two....I think I will need to do repairs in front of the panels that I have ordered as well. I"ll Have to fabricate stuff there... Cheers./ Joe 
 |
| J.D. Hine |
| ouch, that is lot of rust repair work to do. |
| Stuart Duncan |
| can you make some pictures not so close you must start wth one part cutting it away and the rest rusty parts should hold the rest in place the first part will be the difficult part |
| FT Franz |
| Hi again everyone. I thought I would up date as I have received my parts from England and I am beginning to see what a big job this is. The parts are well made, and are longer than I had thought, they go all the way to fire wall and will be very usable, even though I may have to shorten one of them.
I am a bit confused though, the three parts for each side I have received are a outside, that the front fender and the running boards bolt to, the bottom, and the inside of the sill. I haven't begun to cut things up as yet and the car is still on the chassis and I can't get it off till I have room (garage full of cars sleeping for the winter) From what I can see/feel, there is an additional piece in the middle of the sill. Is this a box section that is in there. Would anyone have a drawing or a photo of a cross section of the sill. Also the inner part of the sill that the floor boards bolt through appears to be three layers of metal thick. All the layers are rusty, but the sill parts I have will only replace one of these. Is one of the layers part of the inner box section I have found. Sorry to be long....Cheers. Joe |
| J.D. Hine |
| Hi can you make some pictures from distance and put it in a pdf file inside and outside so we can see all to understand who you can do it a picture says more then 1000 words |
| FT Franz |
| FT, I'll try and get a few more photo's today. The space around the car is kind of restricted right now with a full garage. I'll see what I can do though. Thanks for offering to help. Joe |
| J.D. Hine |
| Hello John and Franz,
I didn't do the work myself, not skilled as you and Franz are, but repairing the rust in my YT was quite a job. The guy who did it took lots of pictures, not dozens but hundreds. I could post you a usb stick or DVD if you think it might help. At least it would show you just how bad things can be after sand blasting reveals the worst. Is the cloud an option? That is beyond my pay-grade, but am willing to try if you know about such things. Anyway. just two pics, a before and after regards Kevin M 
 |
| K G Mills |
| Hi Guys, That sounds like a good idea Kevin. The only help I can offer is to supply a left side running board if yours has contracted rust from the nearby sill. It is in great condition with perfectly round, mounting holes. No rust repair or welding needed. The flange at the outer/under edge needs straightening, otherwise in great shape. Postage might be prohibitive, so I will check that out and let you know what they say. If anyone is interested I can post more photos. Not sure what it is worth .... any suggestions?
Cheers from South Australia, Bob Schapel 
 |
| Bob Schapel |
| A pity. Australia post is usually very reasonably priced, but they have a length limit of 105 cm. A Y running board is about 130 cm. I have put in an enquiry to a transport company, but expect that to be prohibitive. Bob |
| Bob Schapel |
| Hi Bob I know it feels wrong but i've cut things in half before to get it in the measurements---Something like a running board would cut and weld back together ok willy |
| William Revit |
| Thanks William. Yes, that would be easier than mending a very rusty item. Bob |
| Bob Schapel |
| Kevin...thank you for your very kind offer. A usb stick with the photo's would be a great help. The second photo you posted is very similar to my rust, but mine is a bit worse. I would be happy to pay post from Oz if you could do that for me.
Bob, thank you as well for the kind offer of the running board. I am OK in that department. I have spent the time and repaired mine to a condition that will be usable. I hope someone else can take advantage of the offer. Franz....I cant get better photo's right now due to room constraints. I'll get some eventually. Cars should be able to be moved outside in a month or so. Thank you all.....back to struggling with door wood pieces. Joe |
| J.D. Hine |
| Hi Joe, Happy to oblige. I have made up the USB stick. Actually that image I posted is a bit misleading. practically both sills were completely shot. Can you send me a an address please. Either here or on email KGSTIGERS@GMAIL.COM cheers KG |
| K G Mills |
| it this posting Delete this posting
i have made a schematic picture with some colours to explain what i would do but it depends how it looks like in realyty first i would weld some steel inside as i have done it to stabilize the construction the YT will be not too heavy so it will be easy to get it off the chassis with 4 person, perhaps 2 put it about 120 cm from the ground so it will be easy to work on then i would cut away the purple part in my picture if it is rusty and bad then next step the green part then the red and blue part if the black part is too rusty too it will be difficult because it is a curved difficult part make a picture from the purple part i had a parkside akku side grinder with a speed control so it was able to cut with a lower speed i cut away step by step to see what is under the part in my blog you have more pictures as any other place i think, and i have a lot of more pictures but still not enough so make more then you think you can give me a like :-) https://de-de.facebook.com/oldtimerpraxis/ 
 |
| FT Franz |
| Franz Thanks very much for your diagram. I have started the reinforcement of the body like your photo illustrates, and I will be removing it from the chassis in the spring when I have the room in my garage. I'll will be going through your blog and the photo's before I start cutting anything away. I lived in Germany in the 60's for five years and have many good memories of the country and Europe. Cheers. Joe |
| J.D. Hine |
| Hello Joe, I have been trying o send you some images by email. I don't know what I've done but system seems a bit recalcitrant, (bringing up error flags.) Let's know if anything came through I have attached a pdf (nts) of a sketch of what I think is the cross section of my sill here as well. regards KGM |
| K G Mills |
This thread was discussed between 14/01/2022 and 16/02/2022
MG MG Y Type index
This thread is from the archives. Join the live MG MG Y Type BBS now