MG-Cars.info
MG TD TF 1500 Heater system rebuild BBS discussion at MG-Cars.info

MG-Cars.info
Welcome to our Site for MG, Triumph and Austin-Healey Car Information.
Recommendations
Parts
MG parts spares and accessories are available for MG T Series (TA, MG TB, MG TC, MG TD, MG TF), Magnette, MGA, Twin cam, MGB, MGBGT, MGC, MGC GT, MG Midget, Sprite and other MG models from British car spares company LBCarCo.
MG TD TF 1500 - Heater system rebuild
| Heater rebuild I've been busy rebuilding my heater system. I began by pulling everything out and found that the radiator branch pipe was a handmade one made for the heating system that was installed, so it wasn't going to work for my system (the extra pipe pointed the wrong way). I also decided to not use the engine return at the back, but would just add a bleed valve to make it easier to drain. My goals were simple; I wanted it to be as invisible and out of the way as possible, as efficient as possible and as neat and tidy as possible. From an efficiency point of view, taking heat from the back of the engine - which was the existing system - wasn't going to work; it was the coolest water in the system... instead, I would take it from the hottest point, the thermostat elbow, as many others have done. However, I decided to take it from the opposite side of the elbow. Most people take it from the left side (looking from the drivers seat forward) of the elbow and route the pipe back over the spark plugs to the firewall. I decided to take it from the right side, and run it down alongside of the return pipe, and run both under and behind the exhaust manifold. From an efficiency point of view, this is potentially a plus - it could pick up more heat from the manifold itself. Additionally, it makes for less clutter. The problem of course is that it would be a tight fit to go from the thermostat takeoff, alongside the existing bypass tube, and snake down under the manifold. But I was pretty sure it would be possible. I also decided, after considerable thought, to avoid half inch copper tubing and use 5/8" thin wall 304L seamless stainless steel tubing, which would give me a larger crosssection, greater area, and thus more water moved, also adding to efficiency. I bought the tubing from onlinemetals.com http://www.onlinemetals.com/merchant.cfm?pid=14750&step=4&showunits=inches&id=312&top_cat=1 The heater I disassembled, cleaned, partially stripped, and then took to my local powdercoat guy who did a brilliant job using "hammered bronze" (which I talked about on another thread). Then I reassembled everything, and the heater was done. I used electrical knockouts (1.5 inch) to fit in the holes on the sides. I was also lucky enough to find a correct switch and the correct bracket for the switch (which I had powdercoated the same "hammered bronze" so it looks very, very nice. I wanted to add an electric valve so I could shut off water flow to the cabin on hot days (lots of them here in Tucson) and to do that, I built a "sled" which attached to the three rear attachment points on the heater, and mounted the valve on that and plumbed it to the heater. This gave me a nice, sturdy platform that would avoid putting pressure on the valve connections, the tubing, or the heater itself. Then I ran hose out to the firewall, using pipe and some 90 degree hose bends, just to keep it clean and neat. To get around and underneath the exhaust manifold, I removed both the carburetor and the exhaust manifold so I could easily access the area. I built two steel brackets which mounted on the front to the thermostat elbow and on the rear to the rear engine water plate, because I needed something to bolt my tubing to. The bracket that mounts to the thermostat elbow is welded to another 5/8 steel pipe which forms the "backbone" and runs under the manifold to bolt to the rear bracket. That gives me a solid frame to mount brackets to hold the two working heater pipes.I made some simple pipe brackets that attached to the rear steel bracket and to the bottom tube bracket, and clamped the pipe in between. Now I had a clean pipe run which would NEVER touch the manifold, and avoid rattling and vibration as well. I even used some 5/8 ID O rings spaced along the 5/8 tubing to avoid any possibility of rattling against each other or the engine. If you look at the pictures, it's important to understand that of the 3 pipes you are looking at, only the top two are the heating system; the bottom pipe is part of the bracket that holds the whole thing in place under the exhaust manifold. Using a tubing bender, I created the bends I wanted, 90 degree turns at the rear so they come up to pass through the firewall and gentle bends at the front to exit the hot area of the manifold neatly. I also used several 90 degree bend pieces of premolded hose, because it made for tighter turns than I could bend with my tubing bender and one 180 degree piece to pass through the firewall. I tried to build my own branch pipe and cut it into sections and welded them together to make a tight radius and match the existing branch pipe curve; but after many attempts and many leaks, I gave up when I found that it just didn't fit precisely enough. It was leak free; it just ended up not being exact enough to avoid putting too much strain on the hoses that fit it to the radiator and thermostat. (I failed in my attempts to bend the 1 inch pipe myself; I simply couldn't get a tight enough curve, so I tried welding instead). So I ordered a branch pipe from Moss; but I still needed to add a return pipe. In the process of doing this I tried to make a system which would not need a drain valve, in that it would "gracefully" run from the firewall back down to the drain pipe with a continuous drop, so that draining the radiator would drain the branch pipe and the heater return tube. (Of course, the two 180 vertical degree bends that take the pipes through the firewall don't allow for a truly simple system with a continuous drop from heater to drain; they form a 'kink' which will always leave water trapped in the system. But I just didn't have the guts to cut new holes through the firewall to build such a system). I added a second bleed valve at the top of the return line to facilitate draining the system. And the rest is all just hose, 90 degree molded hose sections, and plenty of clamps! I plan on wiring it in so that the single switch does both jobs: it turns on the fan as well as the valve. So until I turn the switch, no hot water will enter the heater. I don't know exactly how efficient it is compared to other systems; I just hope that it will serve me well and avoid overheating me on hot summer days and do a reasonable job of warming me on cool ones. But the best part is that it is out of the way; I just wanted to have the least obtrusive system possible so that I wouldn't have to disassemble it when I wanted to work on other projects... I think it gives you a cleaner look and makes for more room to work on the engine... At any rate, the system is complete (not wired) and filled with water. It will spend the night that way and I'll look for possible leaks in the morning. Once I filled it, the only leak I oculd detect was a slow drip from the thermostat bypass gasket, and simply tightening the screws stopped that. I hope to find it dry in the morning! If so, I'll reinstall the exhaust manifold and the carburetors and start her up! Pictures to follow! |
| Geoffrey M Baker |
The heater rebuilt

|
| Geoffrey M Baker |
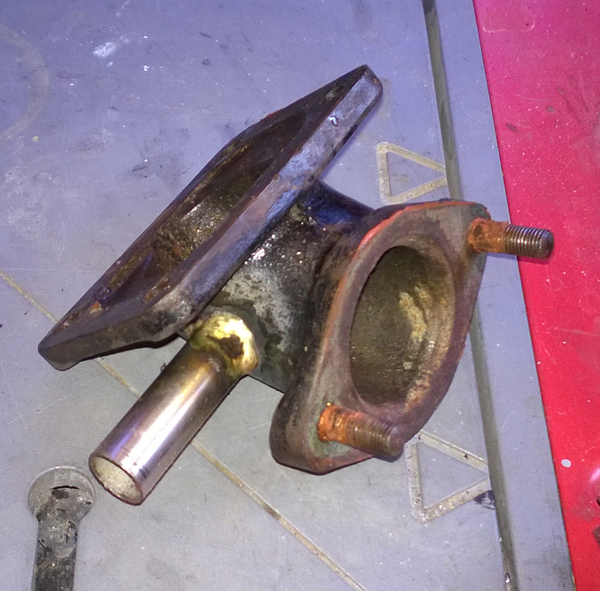
The connection brazed onto the thermostat elbow to provide hot water to the heater
|
| Geoffrey M Baker |
The 5/8 stainless steel pipe assembled under the manifold. Please note, the third "pipe" at the bottom is simply part of a two piece bracket system to hold the other pipes. The front of the bracket bolts to the thermostat elbow, and the rear connects to a vertical bracket which mounts to the rear head plate.

|
| Geoffrey M Baker |
closeup of the rear pipe setup with the clamp bracket.

|
| Geoffrey M Baker |
the second pipe clamp bracket, under the exhaust manifold.

|
| Geoffrey M Baker |
the water pipes exiting from beneath the manifold in the front

|
| Geoffrey M Baker |
the system nearly complete...

|
| Geoffrey M Baker |
the branch pipe with the return pipe soldered in place

|
| Geoffrey M Baker |
Everything plumbed and connected... waiting to check leaks tomorrow!

|
| Geoffrey M Baker |
And by the way, here's the original heater switch and bracket I picked up. I've since had it powdercoated to match the heater in "hammered bronze"

|
| Geoffrey M Baker |
Here's a picture of what it looked like before:

|
| Geoffrey M Baker |
| Mine came with the water hose diverter, below. Also, it's possible you've got the center door mounted upside-down. Mine's riveted, and it opens at the bottom. .... 
|
| MAndrus |
| The doors (on my model Arnolt heater, anyway) are designed to be installed either way, depending on preference. (There are pivot points at both top and bottom). I just liked it this way, it's a purely personal choice. Regarding the standard Arnolt diverter pipe, they designed it that way because it was the simplest install - no brazing, drilling etc needed. Not because it was the most efficient design. My system takes water from the hottest point, uses 25%larger ID tubing to improve flow-through efficiency under low pressure, and returns it by a natural slope to a good low point which means easy draining. Plus it's all under the exhaust. and out of the way. The only thing I would think about doing to improve it further would be to think about drilling directly through the firewall instead of using the provided holes. That way you could create a completely gravity-driven drain system with no locks (the two existing holes force you to route hose UP, leaving a lock in the system no matter what you do.) |
| Geoffrey M Baker |
| Geoffrey, from the tests by another poster, the results are found I. The archives, the difference between the hottest coolant (thermostat bypass, and the corst, rear of engine is a whopping 7C. And that front of engine tap requires a 3 foot heat losing hose run. In the end, The back of the engine tap produces the same result. Regards, tom |
| tm peterson |
| Sometime Tom I will do some temperature tests and post them. I hope to show improvement for two reasons: by using larger pipes than standard I expect to increase the volume of water moved, and the placement beneath the exhaust may pick up a few more degrees, despite the extra 18 inch run of pipe. But main advantage: it's neat and tidy compared to the three thick hoses that snaked throughout the engine compartment before... In my initial designs I was going to keep the rear engine takeoff for the water; but by the time I got around to doing the project and had to disassemble everything anyway, I reckoned I might as well tap into the thermostat elbow. It actually didn't take long to do it, maybe half an hour drilling and brazing. I was certainly aware that there was only a 7 degree difference (in Celsius, so that's about 11 degrees in F?)... small, but not insignificant. If I was living in a cold climate I would definitely do a takeoff from the thermostat elbow. Here in AZ, it was a toss up... but heck, I like practicing my brazing skills. |
| Geoffrey M Baker |
| Link to my heater restoration. http://home.comcast.net/~rrking13/mgaccessories.html www.mgtd.co.nr |
| Rich King TD 8732 |
| Rich, nice work on everything on that page. I have a spare bedroom. C'Mon over, I have a few things that need attention..... |
| MAndrus |
| Dang, I have to say that all of the cars I see on this BB look fantastic! It's a little discouraging though because all of my tinkering will never look that good. :-o |
| SJC |
| Rich I studied what you did - along with quite a few other people - extensively - before undertaking my own "take" on the project! |
| Geoffrey M Baker |
MAndrus, I might just do that to come out for some NASCAR! Geoffrey I hope my site has helped. I really based my install more about appearance then anything else. I really liked the clean look and shine of the copper pipe. If I had it to do over again I would of done the actual heater in original color, but it was one of the first things I did 10 years ago without knowing better. I was powder coat happy! Rich www.mgtd.co.nr |
| Rich King TD 8732 |
| Rich, I was going to do the heater in black powdercoat too, thinking I could always paint it bronze later, but when I told him what the original color was he convinced me to try his hammered bronze powdercoat color and I am glad I did! Update... No leaks, and I ran the engine for half an hour till the water temperature hit 190. I stopped only because I didn't want it to boil as I had not added antifreeze yet. The heater didn't even get warm so either the valve isn't working or there is an airlock. I'm going to test for both today! The heater blows plenty of air at any rate 😃 |
| Geoffrey M Baker |
| Today I drained it, disconnected the lower and upper heater hoses and connected them to a garden hose and ran water until it was running steadily. Then I tested opening and closing the valve and the water stopped and started as it should. Then I refilled the system up to the branch pipe heater bypass tube, and then reconnected the lower heater hose. Then I added more water till the level of the upper heater hose takeoff point, and then reconnected the upper heater hose. Then I topped it off with antifreeze and bled the air from the top hose bleed valve. Started the car and immediately felt the heater air start to warm up! It ran perfectly for half an hour and never got above about 160 degrees, with the heater deliving hot air on demand. The real test is Sunday: we are in the St. Patrick's Day Parade, 2 hours of crawling along in the sun... we'll see how it performs then! Thanks to all the many people who posted their heater info here, from Rich to Laverne and everyone else, and gave me the information I needed to do it myself. Some day, I'll collect some temperature information and post it; all I can say is so far, the heater was putting out toasty warm air and plenty of it, on demand! Now to start thinking about the next project, an alternator installation? |
| Geoffrey M Baker |
| Today, in a dry run for the St. Patrick's day parade on Sunday, I ran the car in the driveway for 50 minutes at idle and she ran well (although she eventually started cycling a bit unevenly and the rpm dropped until she conked out, but then she easily restarted; I'm going to pull the plugs because I suspect its running a bit rich on 1 and 2). The water meter got to 200 degrees and held there in the middle of the dial, which was excellent. No leaking at all. Best of all, the heater put out uncomfortably hot air! I judge the heater rebuild and redesign of the heating system to be a real success and would definitely recommend it. (Knock on my head, I mean wood.) |
| Geoffrey M Baker |
This thread was discussed between 06/03/2015 and 13/03/2015
MG TD TF 1500 index
This thread is from the archives. Join the live MG TD TF 1500 BBS now