MG-Cars.info
MG TD TF 1500 Inner Dash with Radio front BBS discussion at MG-Cars.info

MG-Cars.info
Welcome to our Site for MG, Triumph and Austin-Healey Car Information.
Recommendations
Parts
MG parts spares and accessories are available for MG T Series (TA, MG TB, MG TC, MG TD, MG TF), Magnette, MGA, Twin cam, MGB, MGBGT, MGC, MGC GT, MG Midget, Sprite and other MG models from British car spares company LBCarCo.
MG TD TF 1500 - Inner Dash with Radio front
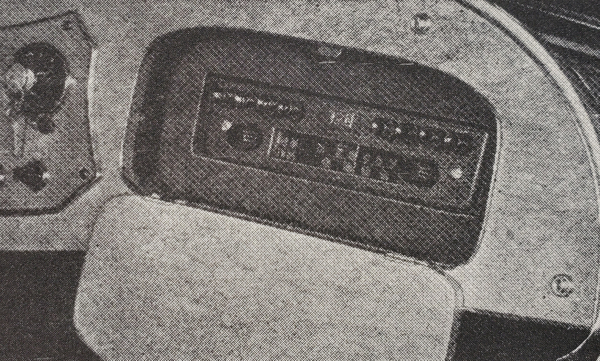
| I got the radio front cut out (shout out to Bill Chasser for his pattern). This is the test fitting with the inner dash. I will be working on the metal bracket tomorrow. 
|
| Bruce Cunha |
Finished the radio installation and built the bracket for the amplifier (it mounts on the inside of the tool box).
 |
| Bruce Cunha |
| What lines the edge of the sub dash? |
| Christopher Couper |
| Nothing around the glove box. It used the original glove box door and trim. I will be installing the inner piping around the inner dash and sides of the car tomorrow. 
|
| Bruce Cunha |
| I am pretty sure that the rough edge of the sub dash was trimmed out with something, but I am not 100% sure what it was.
If I was guessing I would think they must have put black Rexine around the opening before they mounted the radio frame you have in green. Then when the top dash went on it would cover the edges of the black Rexine that would have been tacked to the top of the sub dash. Again I am just speculating because I have never seen a original radio installed before that was not done by a restorer. |
| Christopher Couper |
| I have no idea how the wood radio cutout was originally finished but if it were my car I would use a Rexine like Chris suggested instead of paint. More durable plus I don't think whomever installed these back then had a big selection of paint to match the car interiors. Plus I think it would look nicer, more period, and professional looking. Black Rexine would be a safe way to go. How about flocking it? I've used a kit from flockit.com to restore revolver presentation cases and it is very durable. A different texture and contrast when it borders the Rexine to the dash when you finish it would look great.
The picture of the ad just posted shows the radio cutout a lighter color compared to the black radio and does not match the interior which was a cream color. Just some of my thoughts. This car is going to look fantastic when it is done. Frank TF1414 |
| Frank Cronin |
| That's a great observation Frank. Could it have been flocked? That is an interesting thought. As they flocked the glove box, they would have had the ability to do the radio board. I have both a flocking near the original color and a flocking gun.
Obviously, the picture is black and white so we are not able to tell the color or the finish. You are correct, it does not match the dash, which I am assuming is bisque/tan. It is not green or red as those would be darker. So you have given me another item to try and clarify. I appreciate that thought. Chris, I was going by what a restorer did also. I will do more looking for pictures and if they seem to all look similar to the above, give consideration to flocking. Your thought about finishing the edge in black and then screwing the green covered radio panel on is also an interesting idea. |
| Bruce Cunha |
| TF glove boxes were linen with Rexine to match the interior. TDs on the other hand the glove boxes were flocked if I recall correctly.
If you were not going to install a radio and just have a glove box, what color would the interior flocking be on your car? Green? I would flock the wood radio cutout that color. Flockit.com has a dark green in Nylon close to your color you have painted on now. For a lighter contrast I would the biscuit color similar to the ad in the photo. They will send you samples if you call them and the shipping was quick when I called them last. Frank TF1414 |
| Frank Cronin |
| I just re-read your post and it says you already have the flocking close to the color and a flocking gun. Frank |
| Frank Cronin |
| TD/c-8151 had a factory original HMV-100 radio installation. I still have the tubs original sub-dash. There are no remnants of any flocking. There is no evidence of any Rexine being used or tacks associated with retaining the Rexine around the original sub-dashs glove box opening. There is only the patina of the semi gloss paint used. Bill Chasser TD/c-8151 |
| W A Chasser |
| I don't know how they applied the flocking 65-70 years ago but current procedure is that the colored paint/glue is the same color of the flocking material.
Flocking can fall off due to the old glue drying up. I've seen this with revolver cases made in the 70s and 80s The flocking that was once applied to the plastic insert and foam can be literally brushed off. With the advancement of todays development and production of high-performance adhesive materials, years of durability of the flocking is superior. I am not disagreeing with you what you are seeing. I am just offering some additional insight and suggestions. At this stage of the restoration, there is nothing to loose doing a test to see how the flocking will look. Flocking would be a period correct procedure. I think it would look nice if it were done. If you do not like it, a simple light sanding the wood insert to remove the nylon fibers and repaint it. Frank TF1414 |
| Frank Cronin |
| Here are some enlarged pictures from brochures. The quality is just a notch up from newspaper quality so not the greatest. And of course brochures, especially earlier ones, were often of non production cars.
The square image was a car with solid wheels. The rectangular picture had slotted wheels. Note both pictures are cars with biscuit interiors and the material around the radio was dark. In the square image you can see a glare in the photo at the sub dash which would indicate at least a semi gloss finish, but this does not appear on the later image. Could be about the lighting too. Much less overall glare on the second image in other areas too. 
 |
| Christopher Couper |
| Great Debate.
Bill, so you feel the wood was painted? No vinyl, no flocking. Do you have an indication of what color it was in comparison to the interior? What about edge of the inner dash? Painted also? Chris, I have to wonder if all the pictures in the brocures are the same? The dash's lool all the same in all the brochures. Frank. The TD had a moka colored brown flocking in the glove box I have sent out an Email to Anders Clausager to see if he has any information on the finish. Anders has put in a lot of hours in the research section of the British Car museum and perhaps he may have more on this. |
| Bruce Cunha |
| Bruce, The edge was what I was commenting about. Ive never seen an original fascia board to observe whether it was painted or covered. It may have been brown flocked. IJDK. |
| W A Chasser |
| Bruce: You may be right about it being the same picture. Look at where the dial is on both. Just better reproduction of the image after 3 years I guess. |
| Christopher Couper |
| I received a response from both Anders Clausager and from Tom Metcalf of Safety Fast MG restorations in Ohio.
Tom said that he has not seen a TD with the radio in it, and he has done a number of TD restorations. Anders Clausager said that unfortunately, he has never seen a TD with a radio in the glove box. What he did say was he is of the opinion that the accessories that were offered by MG for the TD were most likely sent to the dealer for installation. Here is what he wrote. "I am inclined to believe that most of the accessories which you list would have been dealer fitted. The problem here was the Purchase Tax applicable in the UK. Anything fitted to the car in the factory would become liable to Purchase Tax at the same rate as the car (at the time, up to two-thirds of the wholesale price) but the tax may not have applied to items fitted afterward. The exception is the radio, since car radios were subject to Purchase Tax in their own right, although I could not tell you the rate. Export cars would probably not have been fitted with accessories, to keep the value for import duty down." With the exception of what is in sales brochures, I have not found any pictures from the factory of accessories on a TD as it was in production or leaving the factory. With this and Anders comment, I now am of the opinion that the accessories, including the radio, were added at the dealer. If the factory had any instructions relating to installing the accessories is not known. I would think they would. If anyone has pictures or other documentation that the factory did add accessories, let me know. |
| Bruce Cunha |
| The MG community has come through again. I posted this question on a number of MG web sites. Wiard Krook, over on the MG Abingdon Factory Remembered page came through with a set of instructions for installing the Radiomobile 100 radio in the 1950 TD.
These instructions clear up a lot of points about the early 100 radio. I now know that the 4 holes on each side of the under dash panel for the tool box are for the radio bracket. There are 4 holes on each side to accommodate the bracket for left and right hand drive TD's. The instructions say the radio came with a Cloth-covered Mask. Cloth-covered could indicate Rexine. The diagram also says that the Mask is installed like the original glove box. You can see the cutouts for the glovebox hinges in the diagram. My thoughts are the mask was made of the same material as the glove box. It could be just the back of the glove box cut off. The instructions show how to cut the under dash panel to accommodate the radio. Later TD's that used the 4100 radio had a speaker mounted into the panel This also shows the exact placement for the antenna. This document adds a lot of great information to our TD knowledge. 
 |
| Bruce Cunha |
| Bruce, Great work in tracking down this document, I wish I had it when I installed my radio. Looking at it closely and comparing it with the underdash space of my car, it seems that in the line drawing of the installation in your document, the scuttle hoop is missing. This means that it applies only to the first 100 cars built. I hope I am wrong, if so I will rip out my support and make and fit this one. John |
| J Scragg |
| Another great observation John. Each time I study the drawing, I see more things.
That could be just something left out by the artist, although I believe you may be correct. The top of the page says 1950 MGTD, but this easily could have been drawn during either late 49 or very early 1950 prior to the scuttle hoop being added. It should not matter. In the picture, the amplifier is attached to the radio. There is enough room for the amplifier to be on the radio. (It just adds a lot of weight) Even though they did make a bracket for the amplifier, they do not list a separate bracket for the amplifier. I now believe it was not used for the TD but was used for other car installations. The instructions for the Radiomobile 4100 do show the amplifier mounted separately. For that radio, you could not mount the amplifier to the radio. The 4100 did not come out until 1951. So the later TD's with the scuttle hoop would still have used the 100 (IMHO) |
| Bruce Cunha |
| Bruce, just a question, why put in a radio? |
| TRM Maine |
| John, the hoop is above the bottom of the tool box where the flat straps are placed on the toolbox mounting bracket.
Re the 4100 series radios. The head is a transistorized unit and much more compact than the amplifier which didnt change in size. The 4100 mounting was different necessitating the use of a remote mounting directly onto the tool box. It should also be noted that the early glove boxes did not have any punch outs associated with the radio installations because the radio was physically larger than the glove box necessitating its complete removal and also the modification of the under dash panel for speaker clearance. Later glove boxes had 2 punch outs at the rear to pass through the coax and power amp supply cords and on the sides there were 2 slit punch outs for the tuner mounting. The intact glove box was otherwise retained. The 4100 series used a 5 round remote speaker that was placed center in the under-dash panel where another punch out was located. A speaker grill then finished the installation. TD/c-8151 came with the HMV 100 TD/C-16920 came with the HMV 4100 series As to the why its a rare and not often seen option and adds to the value of the car. |
| W A Chasser |
| Bruce, Bill, I had a better look under the dash, around the radio and it seems that, even with the scuttle hoop the unit should fit. So another project on my list of things to do. I have attached one page of the installation instructions which I modified for LHD, it makes things a little clearer. I am now trying to find a way to sharpen the text. John 
|
| J Scragg |
| John: Here is a good quality image of the bracket flipped. The better quality jpgs I posted along with the other files you sent me years ago here. https://www.mg-cars.org.uk/mgtd/mgtd_radiomobile_manuals.htm 
|
| Christopher Couper |
| Chris, Thanks for posting the enhanced document and flipped image. Just for my own curiosity, what tool/method do you use to sharpen the print of these documents. John |
| J Scragg |
| I did not need to sharpen them at all since Bruce sent me originals. Those are what I posted to the TD website. But I used GIMP on Windows to extract and flip the image. |
| Christopher Couper |
| I started on the toolbox bracket today. I took the original picture and projected it on my TV. I then made a template of the original holes in the tool box and overlaid these on the tv. Then I adjusted the size until the bolts in the picture matched the holes in the template.
It gives me a general pattern. The length of the bottom edge, based on the bracket on the radio, is 10 inches. The scuttle hoop is an issue. The picture shows a bit of the toolbox below the bracket, but I have to put in the inner dash and add in the back and front mounting bars to get the angle to know exactly where the lower edge of the bracket will go and not interfere with the hoop. I will keep posting as I progress. |
| Bruce Cunha |
| I worked on the front-to-back bars today.
The diagram is a bit incorrect in that they show the bars being parallel. Given there is 12 1/4" from the center of bolt hole to the center of the other bolt hole on the front brackets and the radio is only 10" across, the bars have to taper in. I have been using 2" x 1/8 bar stock to be able to get the edge of the front brackets and also catch the holes in the radio. It may be that what looks like a downward bend in the bar is actually an S bent to bring the bar in to meet the radio. |
| Bruce Cunha |
| Prior to Bruce being blessed upon with receiving the HMV 100 installation instructions, I had begun making a template of my own design since my previous efforts of finding an original Installation came up empty handed over the last four years. Below is my effort. This also allows the amp the be retained on the receiver. It is 13 wide to accommodate the outside width of the L brackets mounting to the sub-dash. It then tapers towards the edge of the receivers overall width of 10. My design was then to have to folds and would then catch two of the firewall to scuttle bolts. The potential disadvantage to my design is that my bracket would have to be installed first and then mount the radio to the bracket. There simply isnt enough room nor enough hands to hold up 17 lbs of dead weight and try to install the bolts, nuts and washers simultaneously.
Bruce and I have been chatting behind the scenes as he attempts to come up with a workable solution to the above illustration. Although the straps in the illustration appear to be narrow and parallel to each other, they also appear to be square to the toolbox mounted bracket. The combined weight of the receiver and amp is 17 pounds and requires the brackets to be of sufficient strength so as to not sag resulting in excess strain upon the toolbox sheetmetal and the radios mounting flange. This could cause stress fractures in one or either to occur. Based on my template I believe the support straps could start out at 2-1/2 wide x 1/8. This could then be tapered down to 1-1/4 at the toolbox bracket if needed. The section Im referring to is outlined in yellow on my template The installation illustration also shows weird bends in the support straps. I dont know what that is all about. It doesnt make sense to me. It looks to me that no bends would be required but I havent been out to look at dads TD/c to investigate this further. Maybe Bruce can elaborate on this once he gets the toolbox bracket scaled to size and fitted. I sent a request to Bruce this AM to see if his friend can cut my templates as well on his CNC machine. Bill Chasser TD/c-8151 
 |
| W A Chasser |
| Bruce,
I also had trouble in determining the shape of the two support strips. Looking at the installation instructions I see from the bill of materials that both sides have the same part number (RMO109), this means that they are identical. They are flat and have the same outline. I have a suggestion on how to proceed with the project, could you concentrate on the details of the front plate, Mask (RMO110) in the parts list. In that case, hopefully, the strips should then just fall into place. John |
| J Scragg |
| Bills design, without it bolting to the firewall bolts, really is a better design than what the factory has. It gives strength across the radio and tapers to fit the front brackets and the back.
John. I am convinced that given the instructions say to install the mask as you would the original glove box, and it has the cutouts for the hinges, the mask was just the back of a glove box. I should be easy, once the radio is in, to slide in the mask and bolt it into the glove box opening. I still have not got a good idea of how it was finished. Instructions say "Cloth Covered" I don't know if that means rexine cloth or just cloth fabrick. I have an old reproduction glove box that was in my car for 40 years that I plan to use as a test mask. If it works, I will use a new reproduction glove box with the black flocking (Not the original color) But it may look good given the radio has a red dial light. With the brackets on the radio, the radio sets reasonably centered in the glove box. It is 7/8 from either side of the inner dash edge and 1 1/4 off the bottom. I still would love to see an original bracket. The front-to-back bars are just not working. They have to slant in to go from the 12 1/2 inches between the side brackets, and drop down to 10" in the back. A 1" bar will only catch one hole in the radio. This picture shows how the radio sets when bolted to the rods. It also shows the issue with the bars. These are 2" 1/8" bars They just barely fit the distance between the radio and the bracket. I slanted the bars in to catch the front and back radio mounting holes and come out at 10" in the back. I aligned the radio with the back edge of the inner dash. The shape of the radio mounting holes also allows a bit of front and back movement. 
|
| Bruce Cunha |
| How are you going to hear the radio or hear the fine sound of your well tuned XPAG? Regards, Tom |
| tm peterson |
| I agree Tom. The sound of the motor is much better than a single-speaker tube radio. But it looks so good sitting there in the glove box. It is just an item you don't see a lot of. From the brackets and antenna holes, it appears the car had one at one time. |
| Bruce Cunha |
| I am still curious what lines the inner dash cutout. It would seem that this 'cloth' would have extensions on it that you somehow wrapped around the rough edge of the inner dash but who knows. Somewhere out there, there must be an original radio installation with these brackets and the mask. |
| Christopher Couper |
| Here is my interpretation of the mask. It is not cloth-covered, but I may experiment with that. This is the back of a Moss reproduction glovebox, cut and fitted. The black looks good, but the picture also highlights the rivets, which I am not that crazy about. They are not as prominent when looking at it directly. The first picture is the radio and mask in the inner dash. The second is with the unfinished outer dash in place. 
 |
| Bruce Cunha |
| Here is the back bracket I fabricated. I used 18 gauge steel. It is on the light side. Once I get it fitted, I may use it as a template for one a bit heavier.
The second picture is a modification on Bill's design changed to move it to the back bracket. The holes will be oval when I put this on the CAD program for the plasma cutter. I will probably go with this design. I still have not figured out the bars in the picture. As the bars are the same part number, they may have a curve that pulls the bar in about 1 1/4" on each side so the bar goes across the radio fastening holes. That positions the radio exactly in the center of the glovebox. 
 |
| Bruce Cunha |
| I see if you leave the glovebox in place it does cover the rough edges of the inner dash. But they must have supplied a mask that slid into the glovebox that was covered in something. If you did want it to match then it would need to be flocked unless it had extra material to cover that bit of the glovebox. What about cooling? Are there not tubes in the head end or is this just a dial, knobs and buttons? |
| Christopher Couper |
| There are tubes in the head and in the amplifier. The case has vents that point down. The under-dash panel gets cut away to allow the sound out and more ventilation. It is really an interesting design on the radio. The tubes are held in place with a spring suspension that holds them down. The round metal cans (I don't know the name for these) have springy brass bent parts that they sit on to put pressure on them and act as a shock absorber. |
| Bruce Cunha |
Bruce. Are you writing about this item? This is identified as a Plessey 12 Volt Non-synchronous Vibrator. I was told what it does back when I purchased the radio sets but dont remember what their specific function was

|
| W A Chasser |
| Bill,
The power input to the radio is 12 Volts Direct Current (DC). The valves (tubes) require a High voltage e.g. 200 volts. A transformer is used to step up the voltage. However: Transformers require alternating Current (AC) to function. The job of the vibrator is to convert direct DC to alternating current. AC is then used as in input to the transformer to obtain the high voltage to supply the valves. Modern electronics use solid state circuits called "Oscillators" to generate AC. The humming noise which you can hear on these radios is generated by the vibrator. John |
| J Scragg |
| Thanks for the input John. Learning never stops. The wound coil in this unit is a very large one. |
| Bruce Cunha |
| Keep your vibrators away from my delicate iMoGene. I swear! |
| Christopher Couper |
| The vibrator was the cause of many radio failures. It would fail to start due to sticky points and a well aimed kick would start it up. In the late 60s I had a Rover 75 which hard a 2 part radio, a dash unit and a peer supply & amplifier located on the firewall inside the car easily located to give a kick, or wait fir a bump in the road the shock it into action. I was an electronics technician and the radio was the same when I sold the car. Peter |
| P G Gilvarry |
| John. Thank you for the information. |
| W A Chasser |
| Thought I would add this photo that I came across today. It shows that a red dash TD had a black radio mask. The mask is the same material as the dash. I zoomed in, but cannot tell if there is material around the edge of the inner dash or if it is just the wood smoothed and painted. I am working to contact the owner to see if we can get more details. 
|
| Bruce Cunha |
| Bruce, interesting picture. Sorry I cant seem to expand the my edited pics. Expand your original pic in the areas shown below. If you look very closely at the materials only the backside of the glove box door appears to be the original rexine. The dashboard and radio fascia appear to be replacement vinyl based on its texture. Also, looking at the upper right side of the subdash before the corner it appears there is some discoloration at the trailing edge possibly indicating bare wood from paint loss but, like you said its difficult to tell
Going back to the graining MG brochure photo with the glove box door open you can make a out a very dark contrast between the chrome trim surround and the radio fascia. That would seem to indicate the the subdash remained painted black. Also note that the in the brochure the fascia is not black. 
 |
| W A Chasser |
| I wonder if they supplied a little carboard like trim you would glue onto the sub dash to make it look nicer. The end cut of plywood would be kind of cheap looking I would think. |
| Christopher Couper |
This thread was discussed between 04/01/2022 and 21/03/2022
MG TD TF 1500 index
This thread is from the archives. Join the live MG TD TF 1500 BBS now